Introduction to Cardiac POCUS
Bailey Freeman, DNP, CRNA and Angela Mordecai, DNP, CRNA
Quick Facts
- Can be performed in 3-5 minutes at the bedside
- Requires minimal equipment: ultrasound machine with cardiac probe
- Provides real-time assessment of cardiac function and hemodynamics
- Complements physical examination and other diagnostic tools
Indications
Cardiac Point-of-Care Ultrasound (POCUS) is indicated for:
- Undifferentiated shock or hypotension
- Suspected heart failure or volume overload
- Chest pain evaluation
- Cardiac arrest or peri-arrest states
- Pre/post-procedure cardiac assessment
- Trauma with suspected cardiac injury
- Dyspnea of uncertain etiology
Absolute Contraindications
- No absolute contraindications for diagnostic ultrasound
Relative Contraindications
- Recent thoracic surgery at probe placement sites
- Severe chest wall pain limiting patient positioning
Procedure
Equipment Needed:
- Ultrasound machine with cardiac (phased array) probe
- Ultrasound gel
- Clean drape or towels
- Proper patient positioning (supine or left lateral decubitus)
Universal Procedure Steps
PRE-PROCEDURE
- Position patient appropriately (supine or left lateral decubitus)
- Prepare ultrasound machine with cardiac presets
- Apply ultrasound gel
- Orient to cardiac anatomy
SCANNING TECHNIQUE
- Overview of the five standard cardiac views
- Basic probe handling techniques
- Orientation to cardiac anatomy on ultrasound
CONFIRMATION STEPS
- Proper machine settings (depth, gain, focus)
- Correct probe orientation markers
- Adequate acoustic windows
Standard Cardiac Views
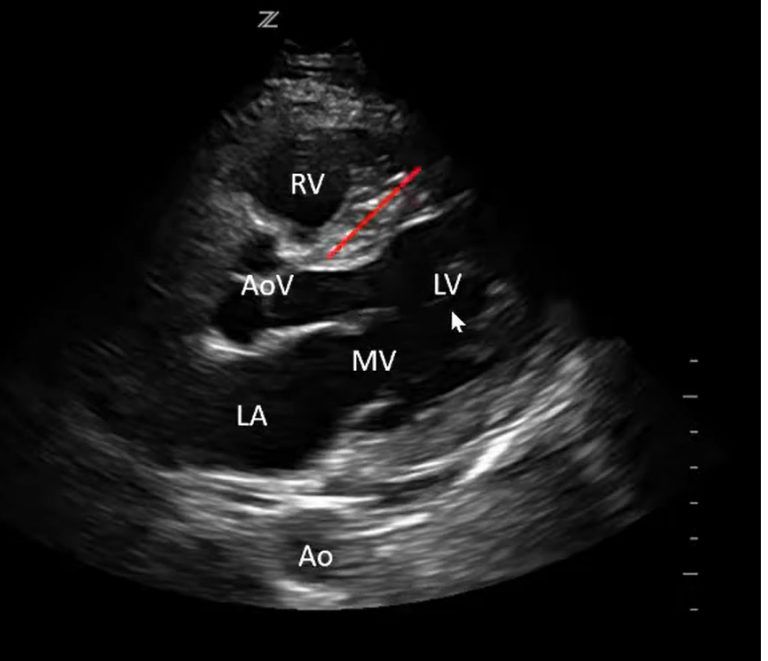
PARASTERNAL LONG AXIS (PLAX)
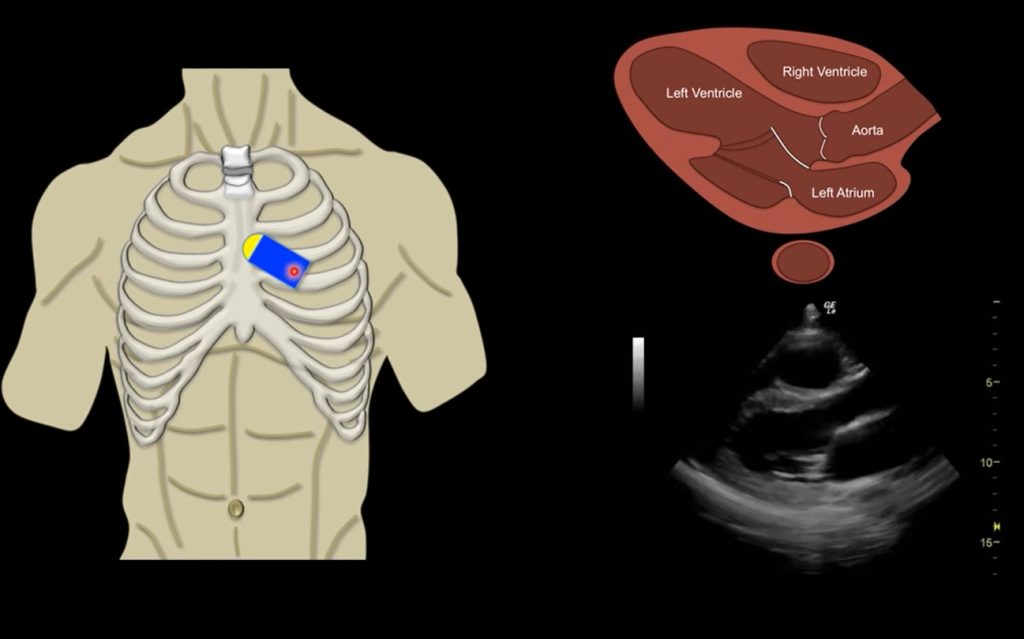
Anatomy
- Location: 3rd-4th intercostal space, left sternal border
- Structures visualized:
- Left ventricle
- Right ventricle
- Aortic valve
- Mitral valve
- Left atrium
Technical Details
- Probe position:
- Indicator toward patient’s right shoulder
- Slight angulation may be needed
PARASTERNAL SHORT AXIS (PSAX)
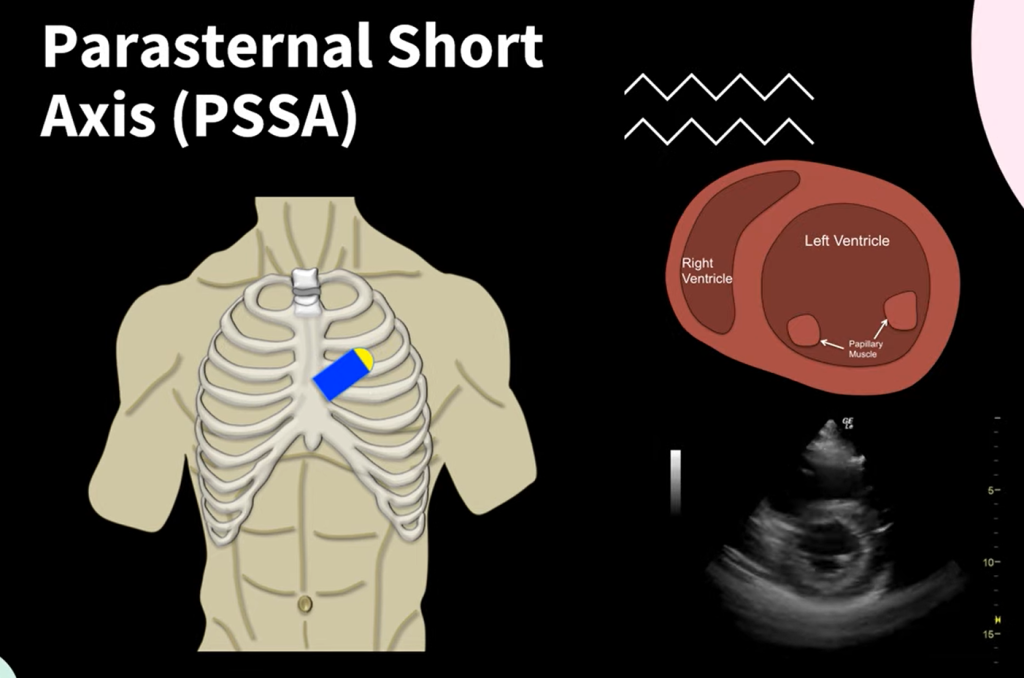
Anatomy
- Location: 3rd-4th intercostal space, left sternal border
- Structures visualized:
- Cross-sectional view of left ventricle
- Right ventricle
- Mitral valve
- Papillary muscles
Technical Approach
- Probe position:
- From PLAX position, rotate probe 90° clockwise
- Indicator points toward left shoulder
APICAL FOUR-CHAMBER
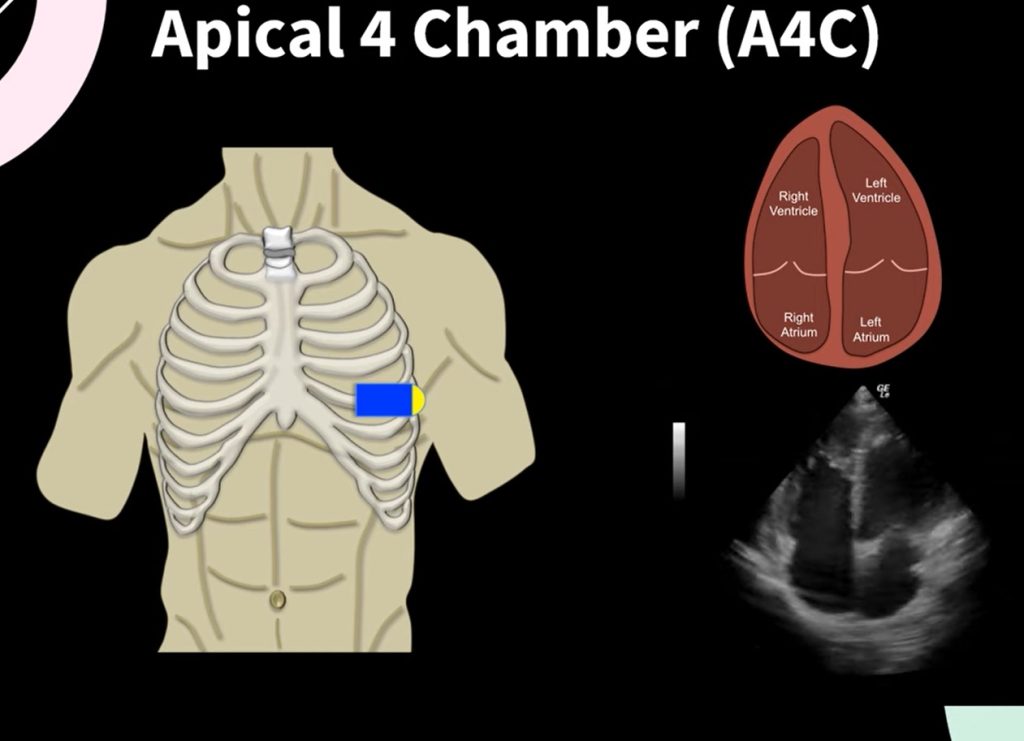
Anatomy
- Location: Point of maximal impulse (PMI), typically near apex
- Structures visualized:
- All four chambers
- Mitral and tricuspid valves
Technical Approach
- Probe position:
- Indicator toward left axilla
- Left lateral decubitus position helps
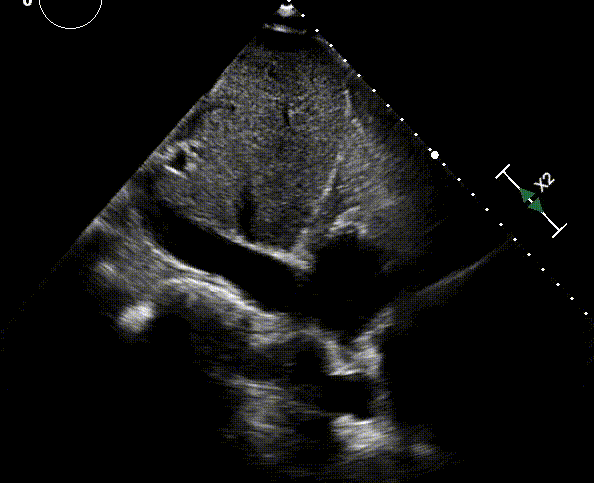
SUBCOSTAL
[Insert Image]
Anatomy
- Location: Below xiphoid process
- Structures visualized:
- All four chambers
- Pericardium
Technical Approach
- Probe position:
- Indicator toward patient’s right side
- Angle under rib cage toward heart
IVC VIEW

Anatomy
- Location: From subcostal position, angle toward IVC
- Structures visualized:
- Inferior vena cava
- Right atrium junction
Confirmation Methods
PROPER IMAGE ACQUISITION
- Adequate depth settings
- Appropriate gain adjustment
- Proper focus placement
- Clear visualization of relevant structures
VIEW ASSESSMENT
- Key landmarks for each view:
- PLAX: LV, RV, mitral valve, aortic valve, LA
- PSAX: Circular LV with papillary muscles
- Apical: All four chambers visible
- Subcostal: Four chambers and pericardium
- IVC: Vessel entering right atrium
Documentation Requirements
- Views obtained
- Qualitative assessment findings
- Integration with clinical presentation
- Limitations encountered
- Significant pathology identified
SCOPE GUIDE
Strategies & Clinical Optimization
Patient Positioning
- Patient position is critical for image acquisition
- Left lateral decubitus improves parasternal and apical windows
- Semi-recumbent or supine for subcostal views
- Machine settings
- Adjust depth to visualize all relevant structures
- Optimize gain for clear tissue differentiation
- Set focus at area of interest
- Approach
- Start with an organized approach to all five views
- Use consistent probe orientation techniques
- Begin with machine presets for cardiac imaging
Respiratory Maneuvers
- Brief breath-holding can improve image quality
- Respiratory variation assessment for IVC
- Deep inspiration may bring heart closer for subcostal views
Technical Optimization
- Fan through structures to ensure complete visualization
- Adjust patient position if windows are suboptimal
- Try alternative acoustic windows when primary views limited
Pearls
- Cardiac POCUS is a skill that improves with deliberate practice
- Start with easier views (PLAX, subcostal) before attempting more challenging ones
- Remember POCUS findings always need clinical correlation
- Use “heel-toe” motion to optimize image acquisition
- Apply gentle, steady pressure for better contact
- In difficult cases, try multiple intercostal spaces
View-Specific Tips
- PLAX/PSAX:
- Try different intercostal spaces
- Adjust probe angle slightly
- Maintain firm contact with chest wall
- Apical:
- Palpate PMI before probe placement
- Full left lateral position may help
- Try during expiration
- Subcostal:
- Have patient flex knees to relax abdomen
- Try during deep inspiration
- Apply firm but gentle pressure
Quick Resources
Key Measurements
- Normal LV function: 55-70% EF
- Normal IVC diameter: 1.5-2.1cm
- IVC collapse >50% with inspiration suggests normal/low right atrial pressure
- Rule of thirds: 1/3 LA, 1/3 aortic root, 1/3 RV in PLAX
Key Images/Diagrams

RV
TV
Right atrium
IVC view probe position. The probe is placed 2-3 cm below the xiphoid process. Marker directed towards the sternal notch. RV, Right ventricle; IVC, Inferior vena cava; TV, Tricuspid valve. Clips created with the use of Z-anatomy.

References
1. American College of Emergency Physicians. ACEP Policy Statement: Emergency Ultrasound Imaging Criteria Compendium
Media Attributions
- Parasternal-Long-Axis-Echo
- image
- Apical 4 Chamber © Matthew Lipton, MD is licensed under a CC BY (Attribution) license
- IVC Measurement is licensed under a CC BY-NC (Attribution NonCommercial) license
- PLAX-ECHO-768×661 is licensed under a CC BY (Attribution) license
- IVC is licensed under a CC BY-NC (Attribution NonCommercial) license
- High CVP IVC
- Low CVP IVC is licensed under a CC BY-NC (Attribution NonCommercial) license
