Parasternal Views
Bailey Freeman, DNP, CRNA and Angela Mordecai, DNP, CRNA
Quick Facts
- First-line views in many cardiac POCUS protocols
- Provide optimal visualization of left ventricular function
- Allow assessment of valvular structures (particularly mitral, aortic)
- Generally easier to obtain than apical views
Indications
Parasternal views in cardiac POCUS are indicated for:
- Assessment of left ventricular function
- Evaluation of valvular pathology
- Screening for pericardial effusion
- Assessment of left ventricular wall thickness
Absolute Contraindications
- No specific contraindications beyond general POCUS limitations
Relative Contraindications
- May be difficult in patients with COPD
- Challenging in obesity
- Limited by chest wall deformities
Procedure
Equipment Needed:
- Cardiac (phased array) probe
- Ultrasound gel
- Patient in supine or left lateral decubitus position
- Ultrasound machine with cardiac preset
Parasternal View Technique
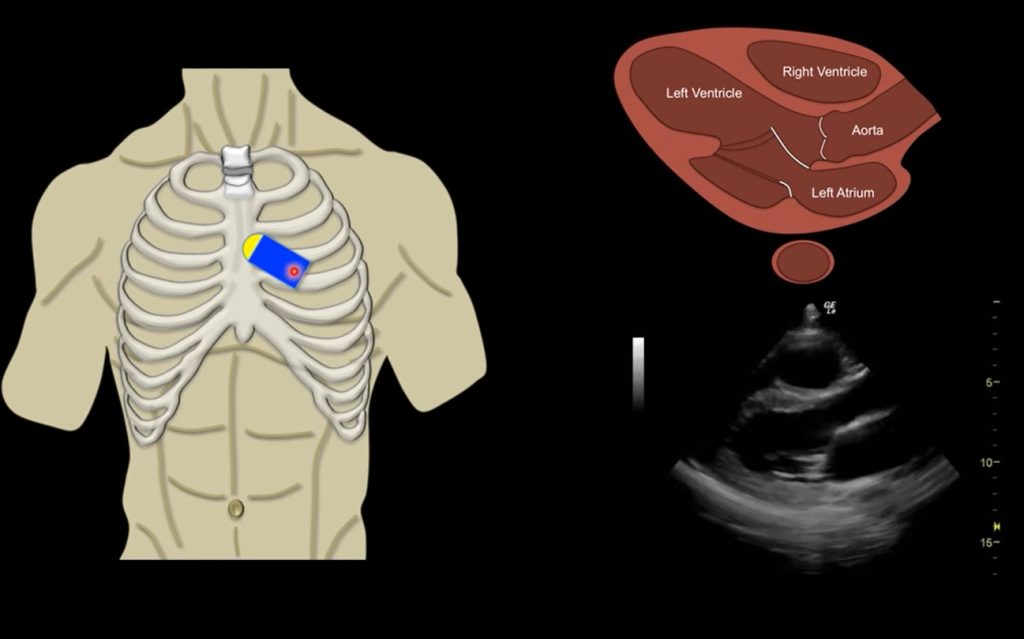
PARASTERNAL LONG AXIS (PLAX)
- Position patient in supine or left lateral decubitus position
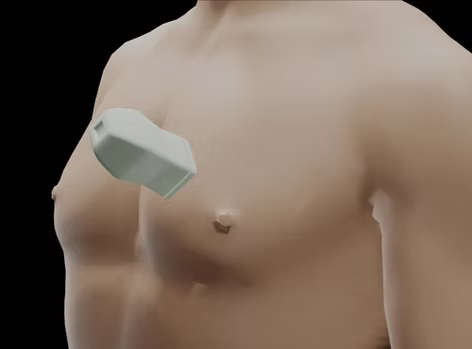
- Place probe at 3rd-4th intercostal space, left sternal border
- Direct indicator toward patient’s right shoulder
- Adjust depth to include all cardiac structures including pericardium
- Fine-tune by sliding probe between intercostal spaces
- Use “heel-toe” tilting motion to optimize image
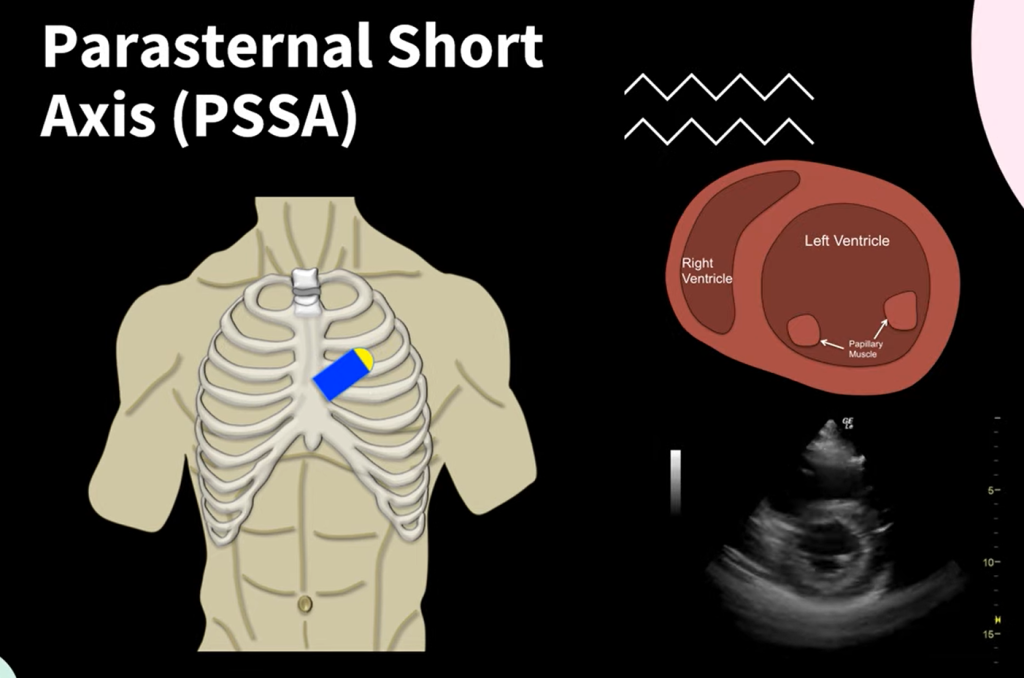
PARASTERNAL SHORT AXIS (PSAX)
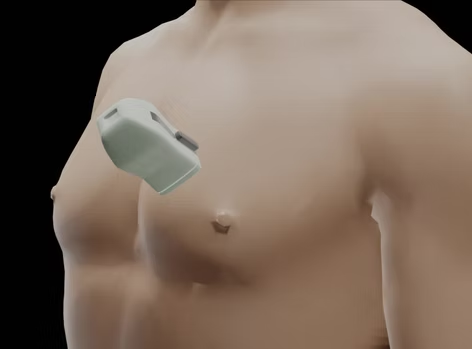
- From PLAX position, rotate probe 90° clockwise
- Direct indicator toward patient’s left shoulder
- Maintain same intercostal space initially
- Adjust position to visualize different levels:
- Base (valvular level)
- Mid-papillary muscle level
- Apical level
- Tilt probe to sweep from base to apex
OPTIMIZATION TECHNIQUES
- Have patient briefly hold breath at end-expiration
- Adjust probe pressure for optimal contact
- Try different intercostal spaces if needed
- Adjust patient position for better windows
View-Specific Imaging Details
PARASTERNAL LONG AXIS
Anatomy Visualized
- Structures seen:
- Left ventricle
- Right ventricle (anterior portion)
- Left atrium
- Aortic valve
- Mitral valve
- Aortic root and proximal ascending aorta
- Pericardium
- Normal proportions:
- Left atrium approximately 1/3 of view
- Aortic root approximately 1/3 of view
- Right ventricle approximately 1/3 of view
Clinical Assessment
- Function evaluation:
- LV contractility
- Anterior and posterior wall motion
- Interventricular septal motion
- Structural assessment:
- Chamber sizes
- Wall thickness
- Valve morphology and function
- Pericardial space
PARASTERNAL SHORT AXIS
Anatomy Visualized
- Base level:
- Aortic valve (circular with three cusps)
- Tricuspid valve
- Pulmonic valve
- Right ventricular outflow tract
- Mid-papillary level:
- Circular left ventricle
- Papillary muscles
- Right ventricle (crescent shape)
- Apical level:
- Smaller circular left ventricle
- Apex of heart
Clinical Assessment
- Function evaluation:
- Global and regional wall motion
- Symmetry of contraction
- Papillary muscle motion
- Structural assessment:
- LV size and shape
- RV size and shape
- Wall thickness
- Valve morphology at base level
Confirmation Steps
PLAX CONFIRMATION
- Verify key structures:
- LV, RV, LA all visible
- Aortic and mitral valves visualized
- Pericardium identified
- Correct orientation:
- Apex to the left of screen
- Base to the right
- True long axis view of LV
- Rule of thirds applied:
- LA, aortic root, and RV approximately equal size
PSAX CONFIRMATION
- Verify circular LV:
- True short axis with symmetrical appearance
- Papillary muscles identified at mid-level
- RV appears as crescent shape
- Base level confirmation:
- Aortic valve with three cusps visible
- Surrounding structures identified
- Mid-level confirmation:
- Both papillary muscles visualized
- Circular, symmetrical LV
Documentation Requirements
- Images at end-systole and end-diastole
- Views showing relevant pathology
- Measurements if performed (LV dimensions, wall thickness)
- Multiple PSAX levels when relevant
- Video clips showing dynamic function
SCOPE GUIDE
Strategies & Clinical Optimization
Image Optimization Techniques
- Patient positioning
- Left lateral decubitus position improves windows
- Proper breathing instructions (end-expiration hold)
- Slight elevation of left side of chest
- Probe adjustments
- “Heel-toe” tilting motion
- Gentle but firm pressure
- Minimal movements between intercostal spaces
- Machine settings
- Appropriate depth
- Focused gain adjustment
- Use of harmonic imaging when available
Troubleshooting Poor Windows
- Alternative approaches
- Try one intercostal space higher or lower
- Request deeper inspiration or expiration
- Adjust probe frequency if available
- Special populations
- COPD: Try more lateral approach
- Obesity: Use more pressure, lower frequency
- Elderly: Account for calcifications
- Technical factors
- Ensure adequate gel application
- Optimize room lighting
- Proper probe grip technique
Assessment Tips
- Functional evaluation
- Compare end-diastolic to end-systolic volumes
- Look for wall thickening during systole
- Assess all visible segments
- Rule of thirds application
- Visual estimation of chamber proportions
- Assessment of LA dilation
- RV size evaluation
Pearls
- PLAX is excellent for LV function, aortic/mitral valve assessment
- PSAX at mid-papillary level is ideal for global LV function assessment
- Look for symmetrical contraction of all LV segments
- A normal heart will reduce its cavity size by more than half during systole
- Maintain probe position over intercostal space to avoid rib shadowing
Key Observations
- Normal findings:
- Symmetric LV contraction
- Thin, well-defined valve leaflets
- No pericardial effusion
- Proportional chambers
- Pathologic findings:
- Wall motion abnormalities
- Chamber enlargement
- Wall thickness changes
- Valve abnormalities
- Pericardial effusion
- Technical tips:
- Slow, controlled probe movements
- Use anatomical knowledge to predict structures
- Compare findings between views
Quick Resources
Key Measurements
- Normal LV diastolic diameter: 3.5-5.6 cm
- Normal septal wall thickness: 0.6-1.0 cm
- Normal LV posterior wall thickness: 0.6-1.0 cm
- Normal LA diameter: 2.7-3.8 cm
Key Images/Diagrams
Anatomical Views
- PLAX landmark structures
- PSAX levels comparison
- Rule of thirds diagram
- Normal chamber proportions
Critical Angles
- Proper probe positions
- Sweeping technique visualization
- Probe rotation angles
- Heel-toe adjustment technique
References
1. American Society of Echocardiography guidelines for chamber quantification
2. International consensus guidelines on cardiac POCUS
Media Attributions
- Parasternal-Long-Axis-Echo
- image
- PLAXvid.jpg is licensed under a CC BY-NC (Attribution NonCommercial) license
- PSAX vid.jpg is licensed under a CC BY-NC (Attribution NonCommercial) license
